
With just a few simple tricks, you really can make creamy smooth hummus at home and yes, we really do think it’s better than store-bought. Jump to the Easy Hummus Recipe or watch this quick video showing you how we make it.
In the past, if we were in the grocery store you could almost bet that one of us would throw a tub of hummus into our cart. That was until we figured out this simple hummus recipe that we honestly believe is better than anything we could have found at the store.
How To Make Smooth Hummus from Scratch
First, let us mention that this hummus recipe uses tahini. In the hummus-loving world, there are two camps. Some love the zest and deep flavor of tahini added, others could really go without it. We like it both ways, but for the best hummus rivaling our favorite brands in the store, we use this recipe and include tahini.
If you want to make hummus without tahini, simply leave it out. A chickpea purée without it is still quite delicious. Just add more olive oil. Another option is to use a natural unsweetened creamy peanut butter in its place.
So, what’s the secret for making the best hummus?
It’s simple really. It’s the order in which you add ingredients to your food processor. Seriously, it’s that easy. Tahini and lemon juice go in first. Then before you add anything else, turn on the food processor and let it run for a minute or so.
To make hummus that’s 100% from scratch, use homemade tahini. It’s ridiculously easy to make yourself. Here’s our tahini recipe with a video showing how to make it. It lasts up to a month in your refrigerator and our recipe makes enough tahini for two batches of hummus.
See the photos below? In the first one, we’re pouring tahini into a clean food processor. After a minute of being whirled, whipped and creamed in the food processor it turns into the paste you see on the right. It’s lighter in color and much thicker.
From here, you can add ingredients as you will, but make sure you stand back and let that food processor run — we’re talking a minute of running after adding each ingredient.
To Skin or Not to Skin The Chickpeas?
Another trick is to remove the skins of each chickpea. We’ve done it. For one can of chickpeas, you’re looking at about ten minutes. We really didn’t want to add the extra time to our hummus, but just to make sure, we tried it both ways — skinless chickpeas and chickpeas right out of the can.
In the photo below, the spoon of hummus on the left used skinless chickpeas. The right came from chickpeas straight out the can.
You can see, even from this photo that the skinless chickpeas made for a slightly smoother hummus, but in our opinion it really wasn’t enough of a difference to warrant ten minutes of skinning chickpeas.
Did you know it’s easy to cook dried chickpeas? You can use canned or home-cooked chickpeas for this recipe. To see how we cook dried chickpeas, see our simple tutorial here. We have included three methods including how to do it in a slow cooker.
More Easy Appetizer Recipes
Did you enjoy our easy hummus recipe? Might we suggest you take a look at more of our easy appetizer recipes. Or, take a peek at some of our favorite and easy snack recipes:
Recipe updated, originally posted October 2012. Since posting this in 2012, we have tweaked the recipe to be more clear and added a quick recipe video. – Adam and Joanne
Easy Hummus Recipe – Better Than Store-bought
- PREP
Homemade hummus is very easy to make and it tastes much better than anything you can buy at the store. If you don’t have any tahini, a paste made from sesame seeds, you can try making it yourself (see our Easy Homemade Tahini Recipe) or leave it out. A chickpea purée without it is still quite delicious. Just add more olive oil. Another option is to use a natural unsweetened creamy peanut butter in its place. We love serving this with flatbread — here’s our easy flatbread recipe from scratch.
You Will Need
1 (15-ounce) can chickpeas or 1 1/2 cups (250 grams) cooked chickpeas
1/4 cup (60 ml) fresh lemon juice (1 large lemon)
1/4 cup (60 ml) well-stirred tahini, see our homemade tahini recipe
1 small garlic clove, minced
2 tablespoons (30 ml) extra-virgin olive oil, plus more for serving
1/2 teaspoon ground cumin
2 to 3 tablespoons (30 to 45 ml) water
Dash ground paprika or sumac, for serving
In the bowl of a food processor, combine the tahini and lemon juice and process for 1 minute, scrape the sides and bottom of the bowl then process for 30 seconds more. This extra time helps “whip” or “cream” the tahini, making the hummus smooth and creamy.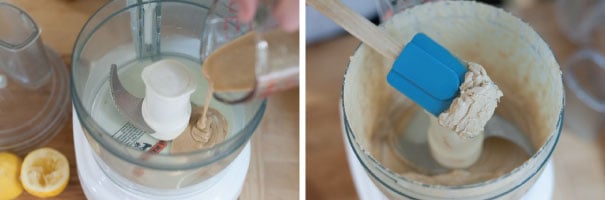
Add the olive oil, minced garlic, cumin, and a 1/2 teaspoon of salt to the whipped tahini and lemon juice. Process for 30 seconds, scrape the sides and bottom of the bowl then process another 30 seconds or until well blended. Open, drain, and rinse the chickpeas. Add half of the chickpeas to the food processor and process for 1 minute. Scrape sides and bottom of the bowl, then add remaining chickpeas and process until thick and quite smooth; 1 to 2 minutes.
Most likely the hummus will be too thick or still have tiny bits of chickpea. To fix this, with the food processor turned on, slowly add 2 to 3 tablespoons of water until you reach the perfect consistency.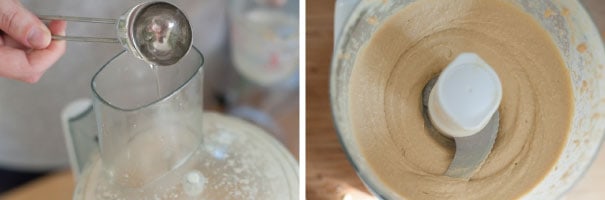
Taste for salt and adjust as needed. Serve hummus with a drizzle of olive oil and dash of paprika. Store homemade hummus in an airtight container and refrigerate up to one week.
Adam and Joanne’s Tips
If you make this recipe, snap a photo and hashtag it #inspiredtaste — We love to see your creations on Instagram and Facebook! Find us: @inspiredtaste
This content was originally published here.